
How to Configure the Ignition Collector (version 24)
If using 8.1.31 or 8.1.32, the provider name must match the collector name. A bug was introduced in 8.1.31 (and fixed in 8.1.33) that prevented the module from working properly without the names being the same.
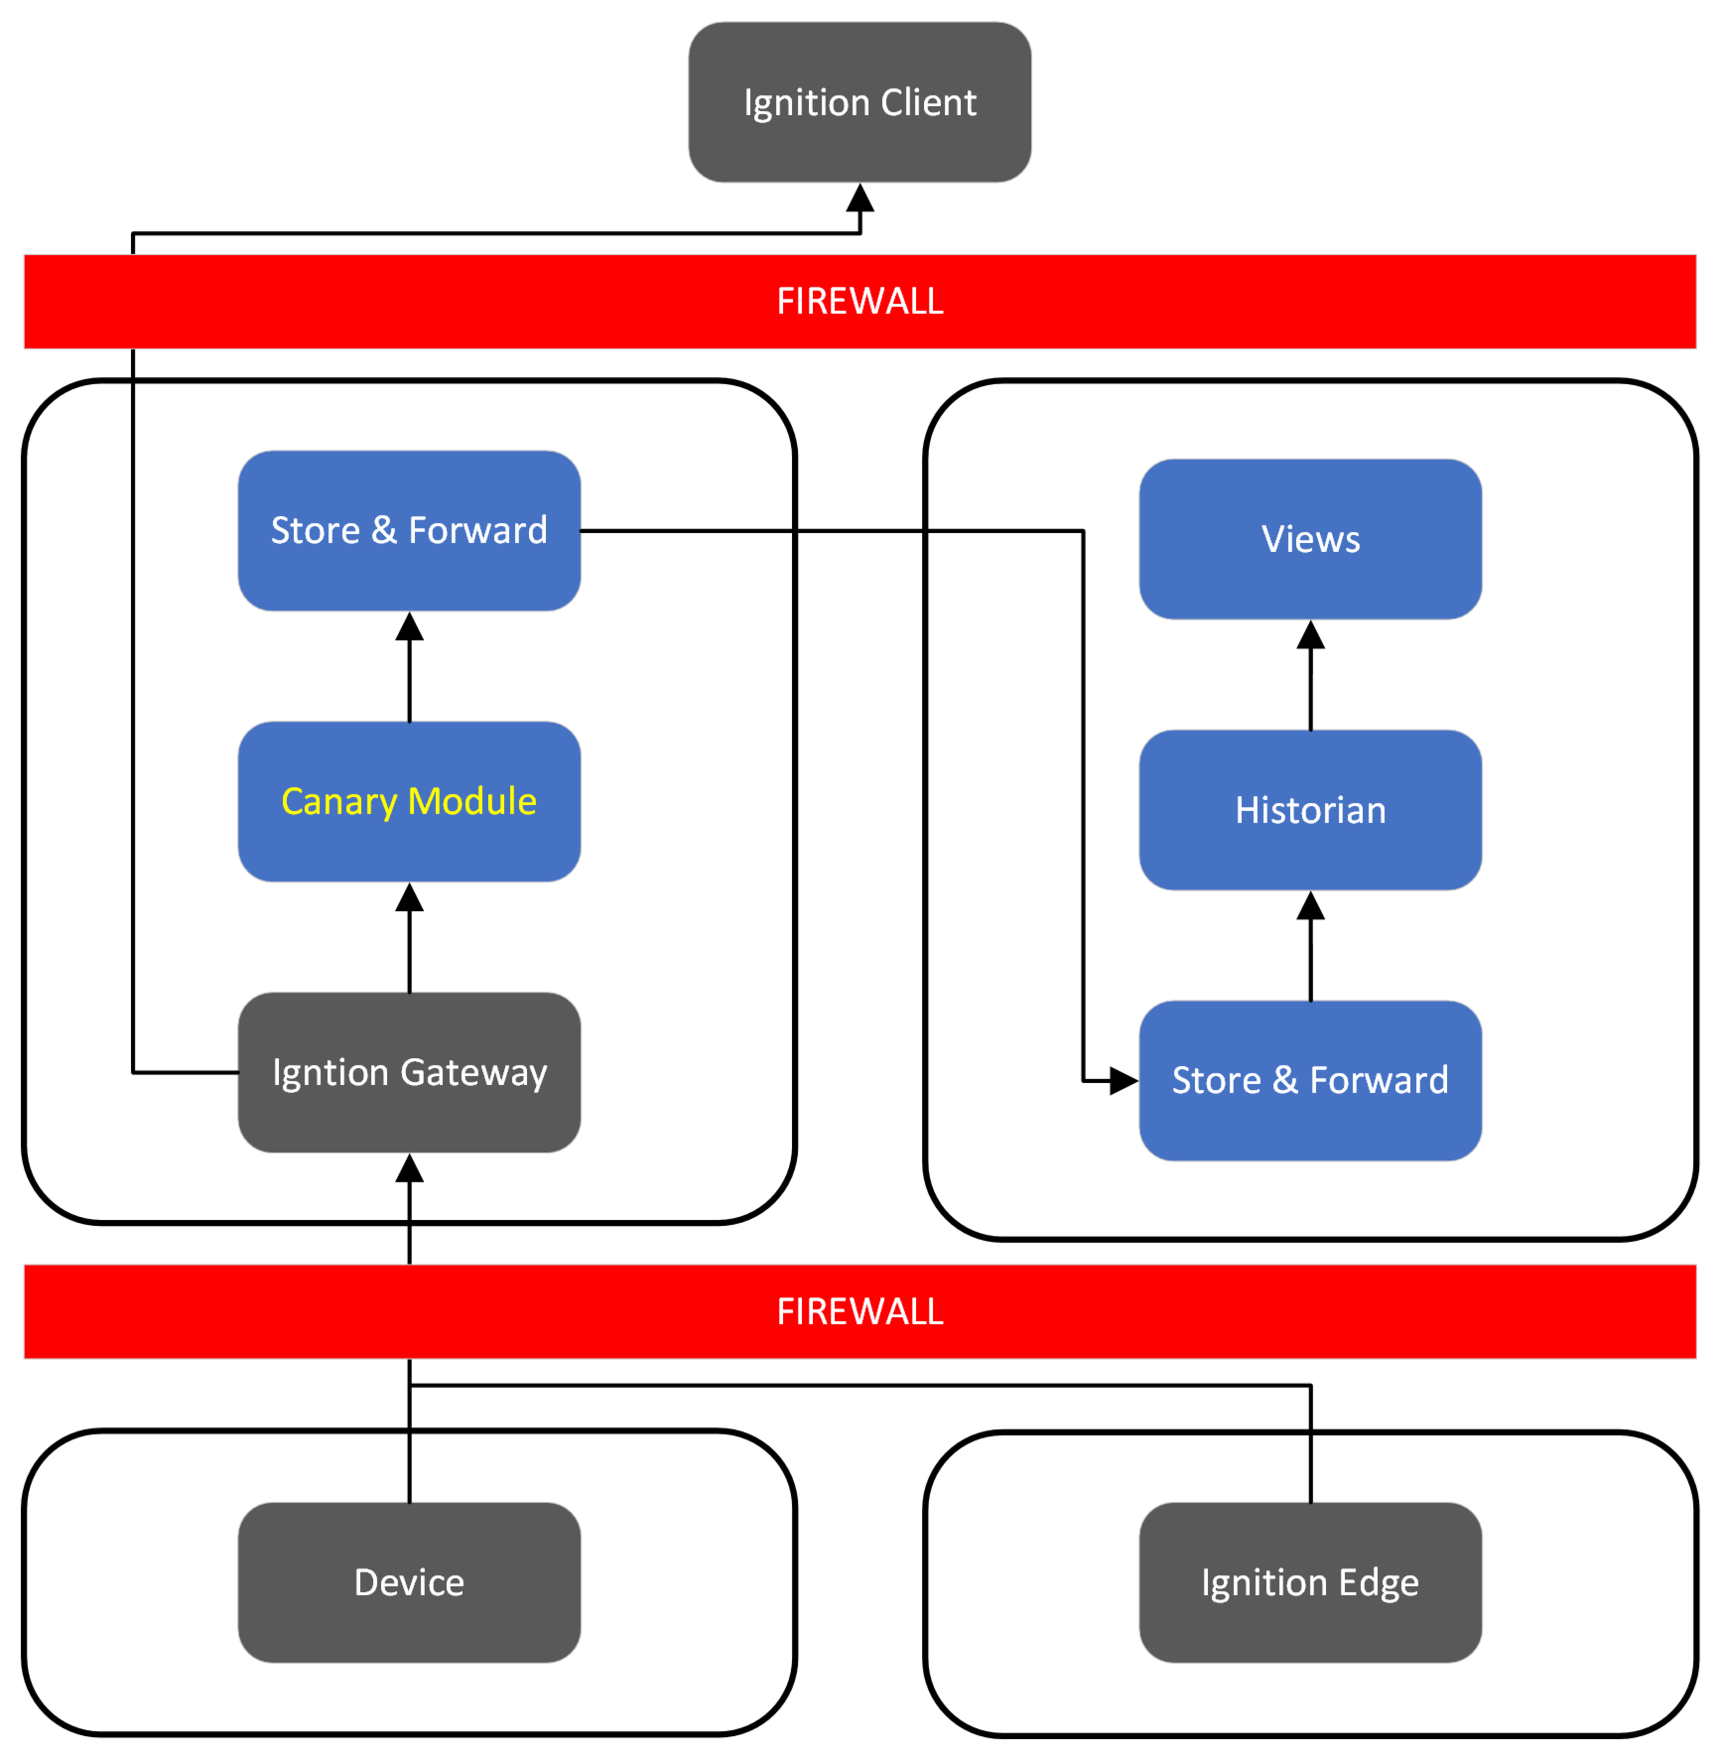
Created by Inductive Automation, Ignition is a software platform that acts as an HMI, SCADA System, and MES. The Canary Module for Ignition can be used to both write data from Ignition 8 projects to the Canary System as well as read historic and last known values from Canary and publish them to Ignition 8 Vision/Perspectives projects. The following explains how to write data from Ignition.
Install Canary Services
- Use the received download link from a Canary representative to download the Canary Installer.
- Run the file CanaryInstaller-*.*.*.exe with elevated privileges on the Ignition Gateway. It is recommended to install the SaF service local to the gateway to utilize Canary's buffering capabilities in case there is a break in communication with the Historian.
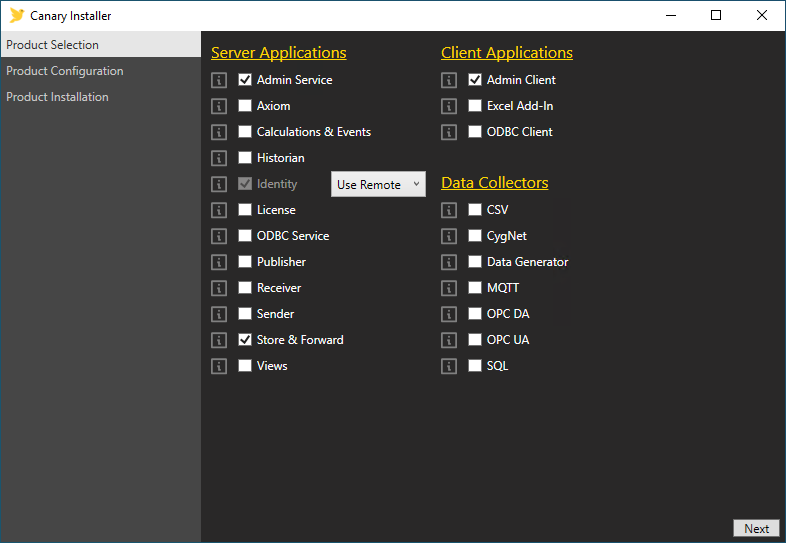
- Install the Admin Service, Identity (local or remote*), Store & Forward, and the Admin Client. Select Next.
*If using best practices, the Identity service should be remote from the Ignition Gateway, installed along with the Historian. The user can specify the server location of the Identity service on the next screen if choosing the remote option.
- Specify the server location of the Identity service if choosing the remote option, then choose where the software will get installed.

- Select Next then Install on the next screen to complete.
Install Canary's Module for Ignition
- Download the free module from here.
- Launch the the Ignition Gateway web application, select Config from the left menu, then select Modules.
- Scroll down to the bottom of the page. Select Install or Upgrade a Module..., then select Choose File and upload Canary's module for Ignition.
- Select Install.
Configure Canary's Module for Ignition
- Within the Ignition Gateway configuration screen, scroll to the bottom of the left menu, select Configure Collectors under the CANARY subheading.
Select Create new Collector and configure Canary as a Tag Storage Provider within Ignition by completing the following fields:

Name - The display name of the Collector. This name will appear when selecting a Tag History Provider in the Designer when history is enabled for a tag.
- Canary Service - Assuming you are following best practices and your Ignition Gateway is running on a Windows platform, this should be 'localhost'; otherwise, enter the machine name or IP address of the Store and Forward (v24+) or Sender (pre-v24) service.
- Canary Service Port - 55293 if using v24+ of Canary software.
55253 (anonymous) or 55254 (secure) if using anything prior to v24. 55254 is only needed if the Sender service is remote from the Ignition gateway and the user wants to make a secure connection to it. It is a best practice to have the Sender or SaF service installed locally to the Ignition gateway.
*Anonymous - Used to make an anonymous connection to the Sender service. Uncheck if using v24+.
*Username/Password - Only used if making a secure connection to the Sender service. Leave blank if using v24+.
API Token - Token used for secure access if Tag Security is enabled within the Identity service . This token can be used for both the Collector and Provider side of the module. The Canary user linked to the token should be given read/write permissions at the root View level within the Identity>Security>Tag Security screen.

Historian - The machine name or IP address of the Canary Historian. It is recommended this not be the same machine as your Ignition Gateway. You can send to multiple Historians by using a comma as a separator (e.g. Historian1, Historian2, etc.).
DataSet - The name of the DataSet you wish to log all tags from this Storage Provider. The DataSet will be part of a tag's name.
As a best practice, keep each DataSet to less than 25,000 tags. If you think you will exceed this amount, edit the
C:\ProgramData\Canary\StoreAndForward\store_and_forward.service.json file and set the DynamicDataSetIsEnabled parameter to True. This will create new DataSets as needed if you exceed 25,000 tags (e.g. DataSet, DataSet2, DataSet3, etc.).Lower Case Tag Paths - By default Canary will copy the case structure of your Ignition tag names. If you enable this field you will force all upper case to lower case and will result in your Canary tag names being entirely lower case. Note, Canary is case sensitive and will create separate historical tags if case does not match.
Collector Enabled - Enables the Collector to send data to the Canary Historian.
Read/Connect/Write Timeout - Timeout settings the module uses to establish a connection with the SaF or Sender service. Do not change unless directed otherwise.
Click Create New CanaryCollectors when complete.
You may create additional Collectors to enable additional logging to additional DataSets. It is recommended you keep a 'one-to-one' relationship for your Collector sessions to DataSets, meaning do not create multiple Collectors logging to the same DataSet. While this will work, it is not a best practice as you may later wish to individually manage your DataSets without interrupting the logging of data for your entire system.
Redundant Ignition Servers
If using a 'cold standby' Ignition server as your redundant server, duplicate the exact same configuration on that server as above. If the server should engage, the same tag name will be used and write data to the Canary Historian without any issue.
Begin Logging Data
- Open your Ignition Project, and navigate to a tag you wish to enable history for. Right-click on the tag and select Edit tag.
- Enable history for your tag and select your newly created Canary Collector as the Storage Provider. Since the module is built on top of Ignition's Tag History Module you can take advantage of all history settings including deadbands, tag groups, and min/max times between samples.
