
How to Add an Entra ID Provider (version 26)
By default, Canary uses Windows AD for user authentication; however, Canary also supports OAuth 2.0/OpenID Connect. This gives end users alternative options for signing into Canary's application tools (Canary Admin, Axiom, and Excel Add-in) while supporting SSO. Below are some examples of supported OpenID Connect providers:
- Entra ID (Azure)
- Microsoft AD Federation
- Okta/Auth0
- Customer-Defined OAuth Providers
To add an OpenID Connect provider, the following steps can be taken. In this example, we are adding an Entra ID provider. Parameter names and configuration may vary depending on the provider.
- Open the Canary Admin and navigate to the Identity tile>Configuration>Providers screen.
- Click ADD in the OPENID CONNECT PROVIDERS section.

- Fill in the Provider Display Name, Provider URL, Client ID, and Client Secret as provided by the identity provider. The Provider Display Name does not need to match anything coming from the provider, but should be intuitive. In this example, we are just calling it Azure.

Use the OpenID Connect metadata document URL for the Provider URL. Remove "/.well-known/openid-configuration" from the end of the URL.
Use the Application ID for the Client ID.
A new client secret should be created for the Identity service within the IDP. Use the Value for the Client Secret.
- Click ADD and apply changes.
- Add a Redirect URI to point the identity provider back to the Identity service on the Canary server (e.g. https://canary-server-name:55353/oidc/callback/login/provider-display-name). This redirect URI will be used specifically for the Excel Add-in and Canary Admin client. Axiom will use a separate redirect URI created in the next step. The URI needs to be all lowercase.

- Add a Redirect URI for Axiom. Starting in v25, Axiom utilizes a reverse proxy which allows the Identity service to use the same port as Axiom, 443, to communicate with the Identity service. (e.g. https://canary-server-name/identity-proxy/oidc/callback/login/provider-display-name) The URI needs to be all lowercase.

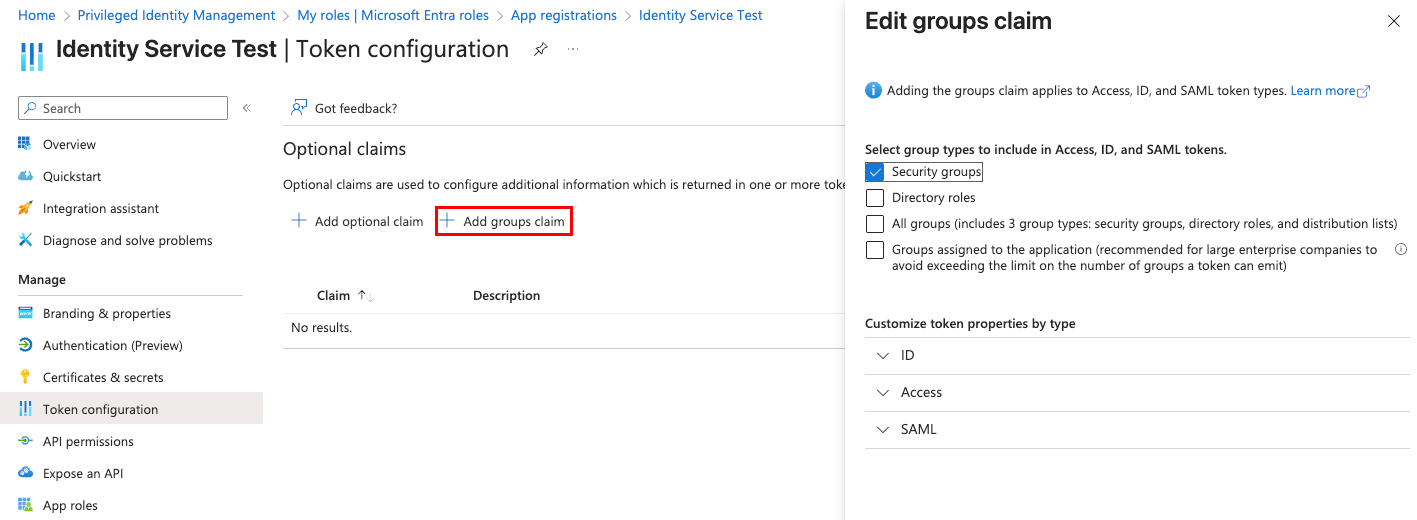
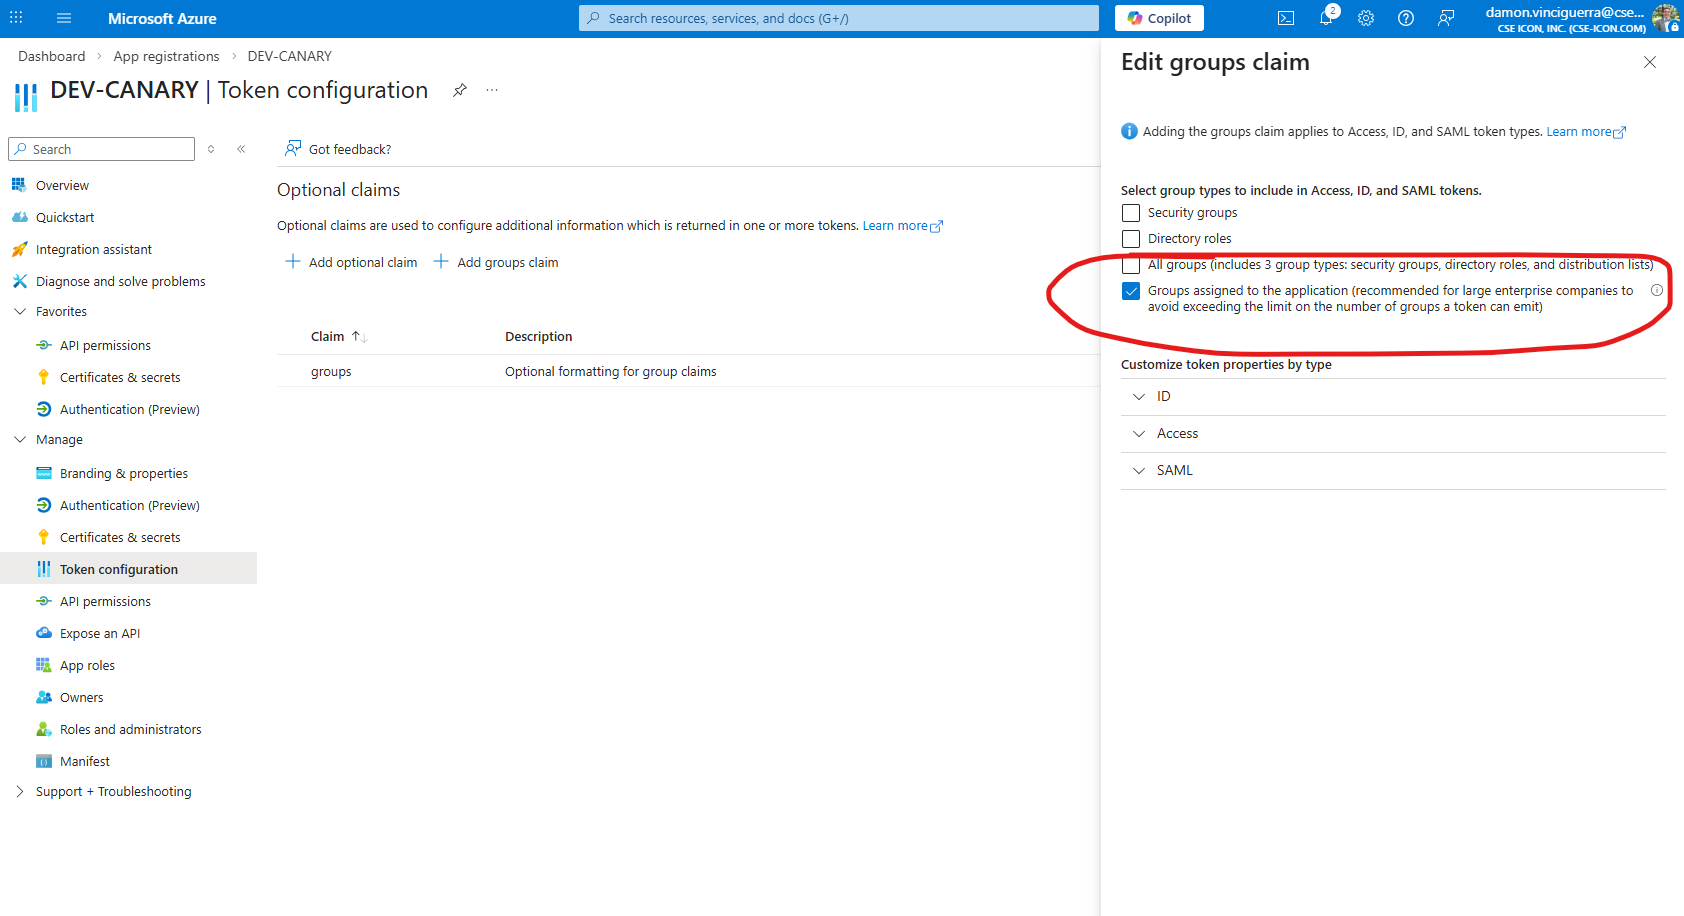
- Create a group claim for the app registration. Selecting Security groups will return ALL groups a user is in.
If not wanting to return ALL groups, select Groups assigned to the application.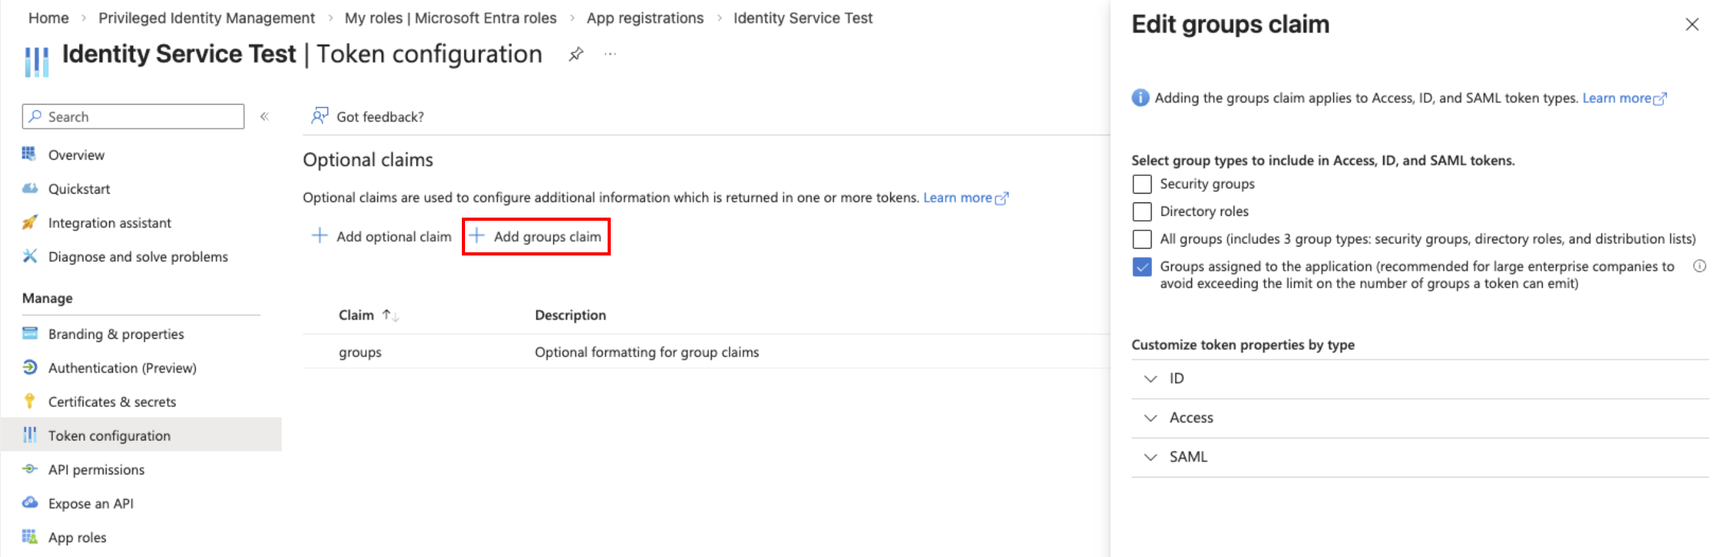
Groups must then be manually added through the Users and groups page of the Enterprise apps tab.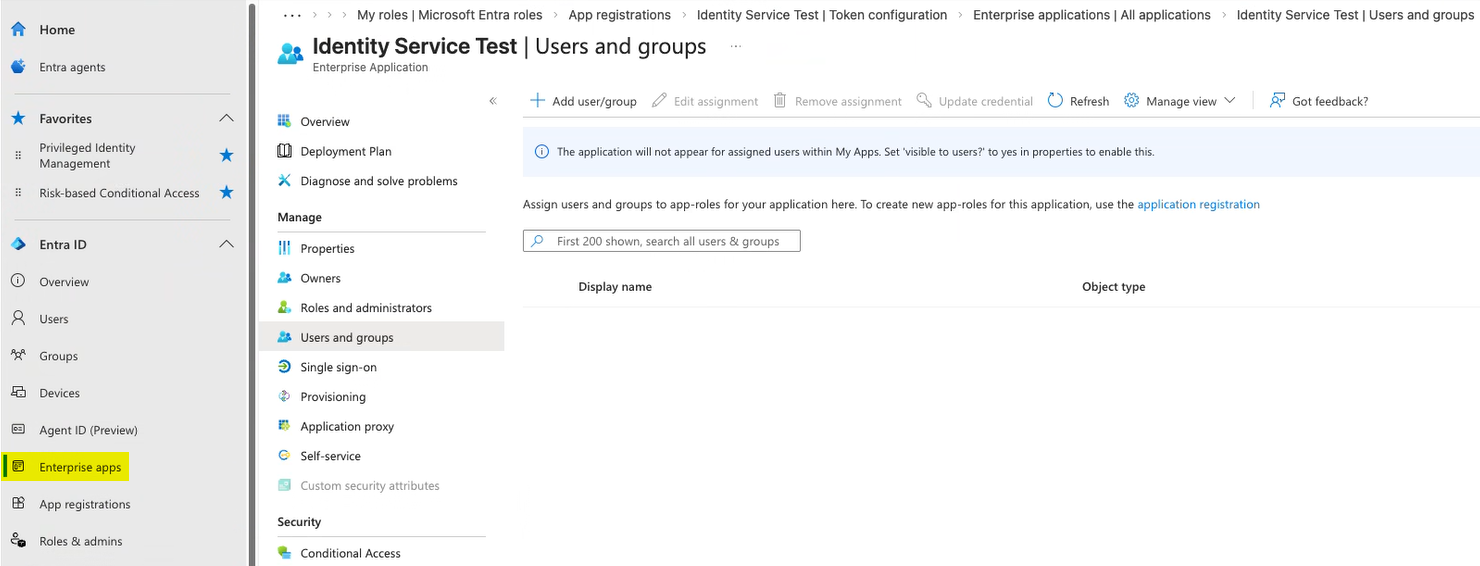
- Navigate back to the Identity tile and click AUTHENTICATE.

If the information is correct, the following message should appear:
- Navigate to the Messages tile and look for the following Info message at the top of the list. This will contain the claims that are needed to complete the OpenID Connect provider.

- Navigate back to the Identity tile and EDIT the newly created OpenID Connect provider.
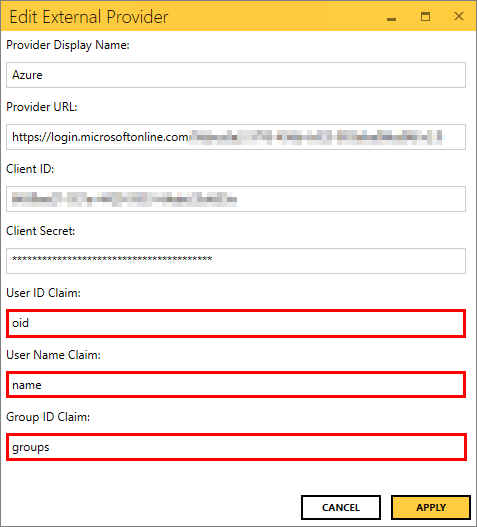
- Fill in the User ID Claim, User Name Claim, and Group ID Claim using the claim labels (not claim ID's) from the message then click APPLY.
Once configured, the user will see the available option when logging into the Canary Admin, Axiom, or the Excel Add-In.

If wishing to then disable Windows AD, uncheck the box 'Enable Active Directory' within the Identity tile>Configuration>Providers screen.
Troubleshooting: invalid_token — "The signing key associated to the specified token was not found"
Symptom
After completing the steps above, a user attempting to log in via Entra ID sees an error in the browser similar to:
error:invalid_token
error_description:The signing key associated to the specified token was not found.
error_uri:https://documentation.openiddict.com/errors/ID2090
Cause
This happens when Entra ID signs OIDC tokens for the application with a key that is specific to that application, rather than with Entra's generic tenant-wide signing keys. The most common cause is an Entra ID application that is also configured for SAML-based SSO — this causes Entra to use an app-specific signing key instead of the generic ones. (There may be other cases that trigger the same behavior — for example, an application using custom signing keys from a claims-mapping policy — but SAML co-configuration is the confirmed cause seen so far.)
By default, Identity requests Entra's generic metadata document, which points it at the generic signing keys — not the app-specific key the tokens are actually signed with, hence the invalid_token error. Appending an appid parameter to the metadata request tells Entra to return the correct, app-specific keys instead.
Resolution
Identity's OpenIdConnectProviders configuration supports a ConfigurationEndpoint setting for each provider (this is null/unset by default) which accepts a relative or absolute URL, letting you override the metadata document URL that Identity requests instead of deriving it from the Provider URL/issuer.
To resolve this error for an affected provider:
- Open %ProgramData%\Canary\Identity\identity.service.json
- Set the
ConfigurationEndpointvalue to the metadata document URL with theappidquery parameter appended:
https://login.microsoftonline.com/{tenant-id}/v2.0/.well-known/openid-configuration?appid={your-app-client-id}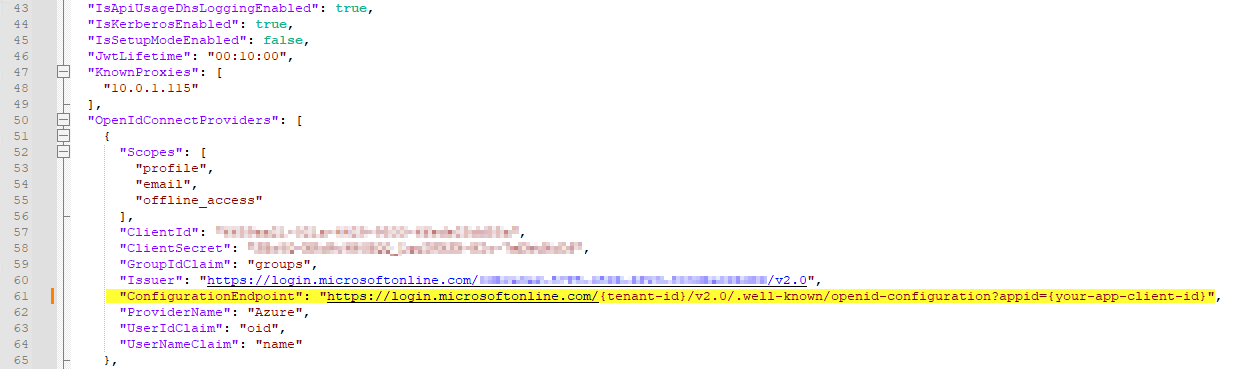
Replace {tenant-id} and {your-app-client-id} with the tenant ID and Client ID (Application ID) used for that provider. Save/apply the configuration change and restart the Identity service, then retry authentication.
3 replies
-
I don't know how I missed this button before. One beef I always had was that Entra returns ALL groups that anyone is in. It makes thing super messy. There's literally a check box to fix that problem.
You have to make sure the groups you're leveraging in Canary are mapped to the associated Enterprise app. But, if you do, only those relevant groups get sent to Canary. Game changer.
-
Nice find ! Thanks for the contribution! I updated Step 7 to include this information if other users want to go down that path.
 Print this page