0
How to Create a Virtual View (version 25)
Knowledge Base / Version 25 / System Admin Duties / Views and Asset Models
Before creating a virtual view (or asset model) it is important to understand its intent and purpose. The following article provides foundational understanding of how a view works and should be reviewed before creating one: Virtual Views and Asset Models Primer.
Configuration
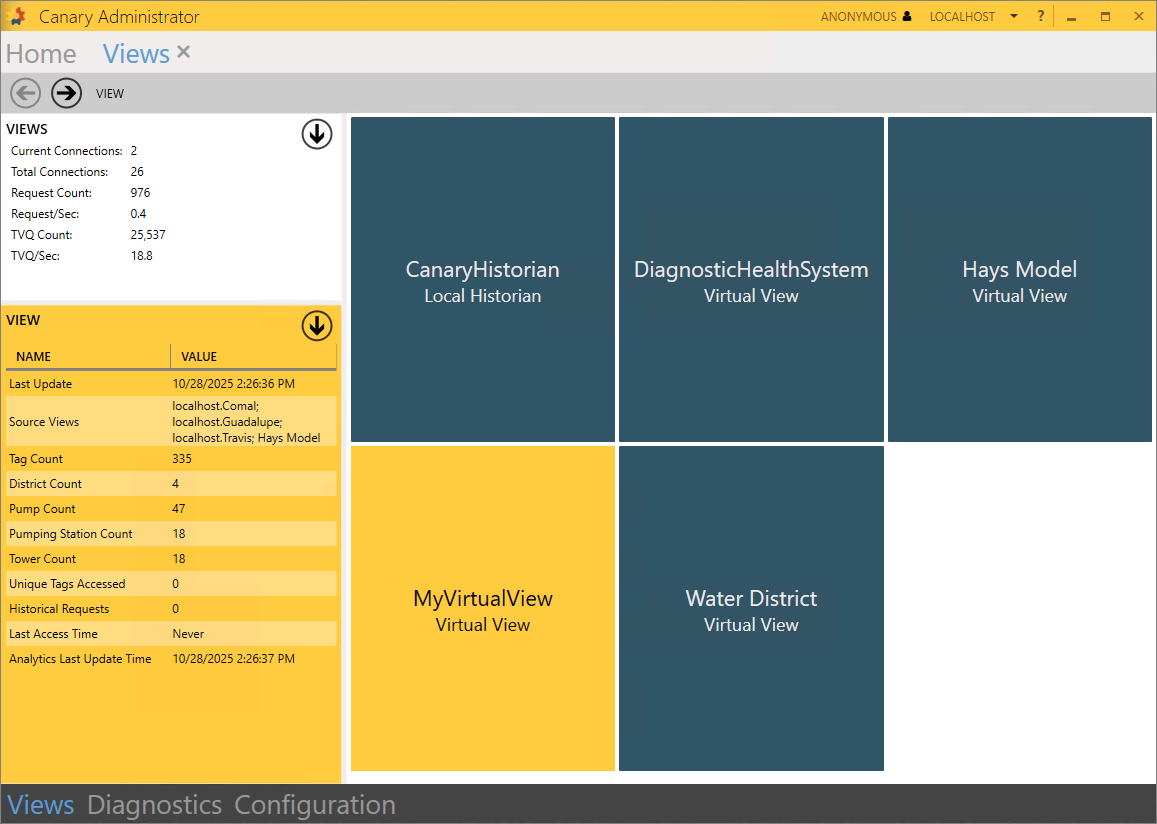
- Open the Canary Admin client and navigate to the Views tile.
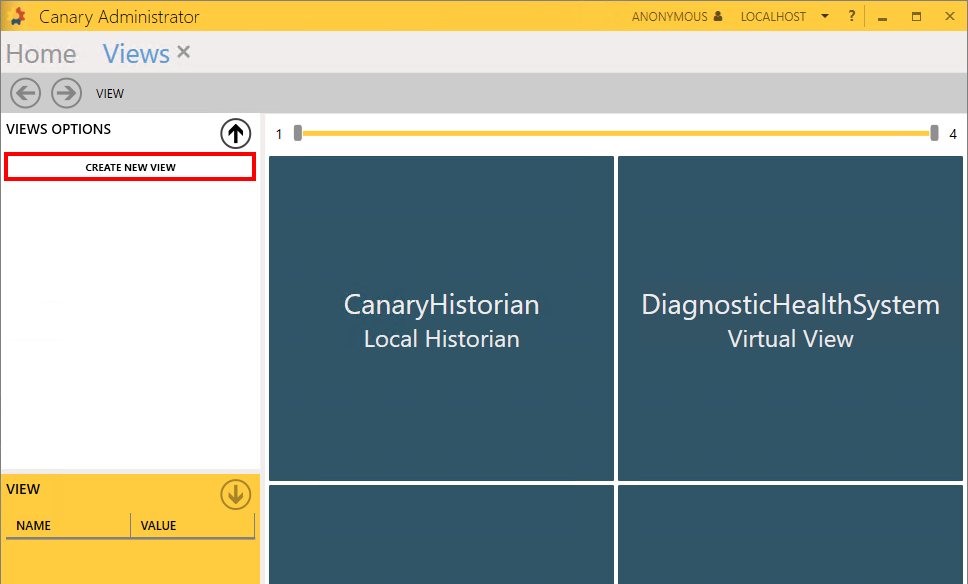
- Click the down arrow from the VIEWS OPTIONS window and select CREATE NEW VIEW.
- The Create View menu will appear. Type in a View Name.
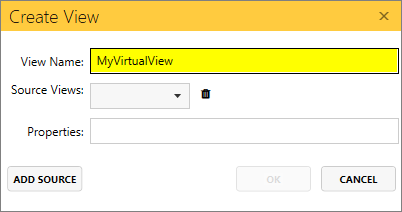
- Add one or more Source Views. This will most likely be a DataSet from the Historian if no other virtual views have been created. First, select the Historian view, then select a DataSet from the subsequent drop-down list. The user can continue to drill further into the DataSet if wishing to limit which tags will be used in the virtual view.
If wanting to add multiple DataSets into the virtual view, click the ADD SOURCE button and a new row will appear to repeat the process. In this example, we are using three DataSets from the Historian (Comal, Guadalupe, and Travis).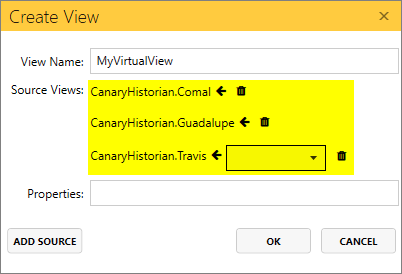
A virtual view is built using DataSets as its sources and/or other virtual views. In some cases, it may be easier to build a virtual view on top of other virtual views because work has already been done in a previous view which you want to use in a future view. The process is the same to add the source and choose a virtual view instead of a DataSet. In this example, we're also including the Hays Model which is a preexisting virtual view.
- (Optional) Include properties. Sometimes a tag name coming from SCADA is not descriptive enough or is too cryptic to understand. Properties (or metadata) are used in a virtual view to accommodate for these shortcomings and provide context if there is not enough information within the tag name itself. The tags' property values are appended to the end of the tag name and separated with ##'s (i.e. Canary Oil.Aberdeen 1H.GM_PRCASXIN##Blair##Gas Meter##Casing Pressure). If a tag does not have the properties listed, they will appear as ##NA.
Properties are separated with semicolons (;).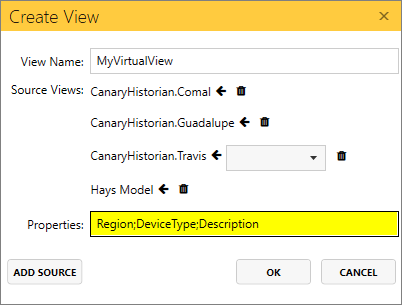
The properties shown here are only listed for instructional and display purposes as the actual virtual view in this example does not require them.
- Click OK and the Views Edit screen will open where the user can add Regular Expression (RegEx) rules to transform and alias tag names into the desired naming convention and/or define the various types of assets that will be present in the model.
Starting in v25.4, a list of common RegEx functions are listed in the top-left window along with their descriptions. Custom functions are also made available to alleviate some of the challenges of using regular expressions if a user is not familiar with them.
The yellow bar in the middle of the screen can be expanded to reveal the tags that are in the view. The VIEW NAME in the left column displays how the tag name is currently presented in the view and is mapped to the PHYSICAL NAME in the right column. The VIEW NAME will update as RegEx rules are applied which transform the tag path.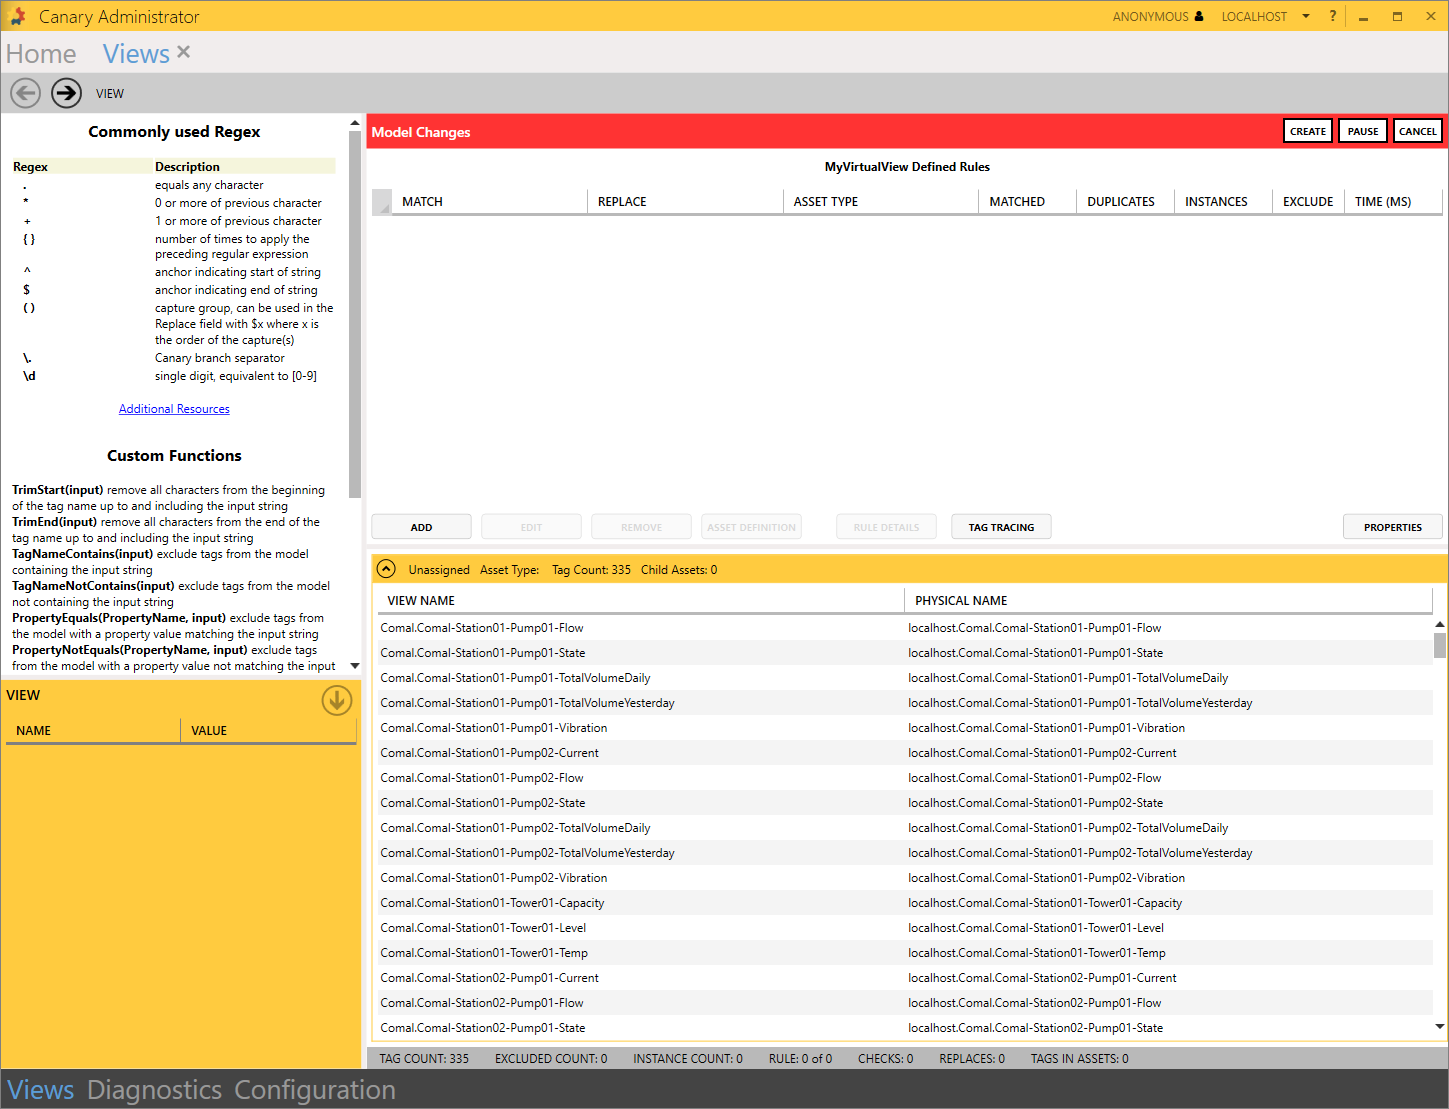
- ADD rules as needed to modify tag names and define asset types. This is where the bulk of the work in creating virtual views comes in to play and where the complexity begins. Model Rules are typically performed first to create the desired hierarchy within the tag structure. The first rule presented here is simply replacing any dash (-) with a period (.) as Canary uses the period to separate branches within the tag path.
The next rule targets the beginning of the tag string using the caret (^) symbol to remove some redundancy that is not needed. The Replace field is left empty for this reason.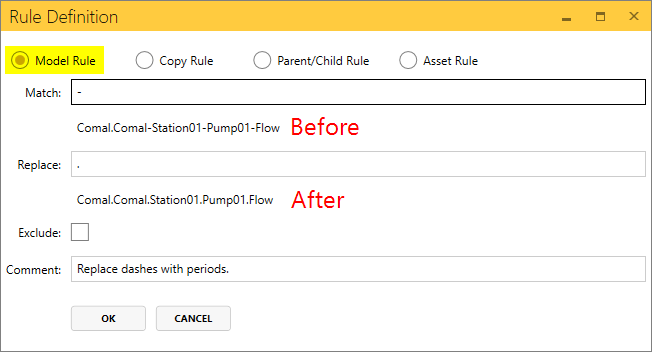
Comments can be added to describe the purpose of the rule. Checking the Exclude box will remove the matched tags from the view altogether.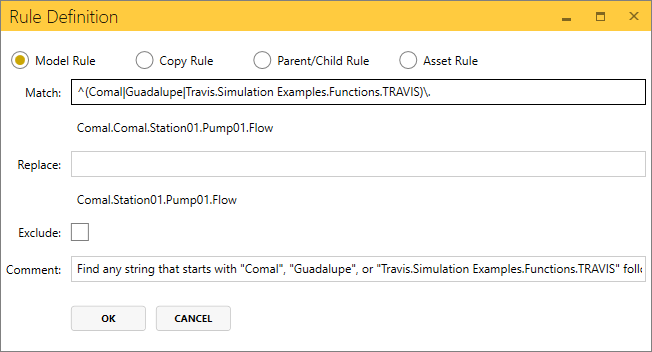
Rules are applied in chronological order and can be reordered using a click-and-drag. Rules can be duplicated simply by selecting the row and using Ctrl+V.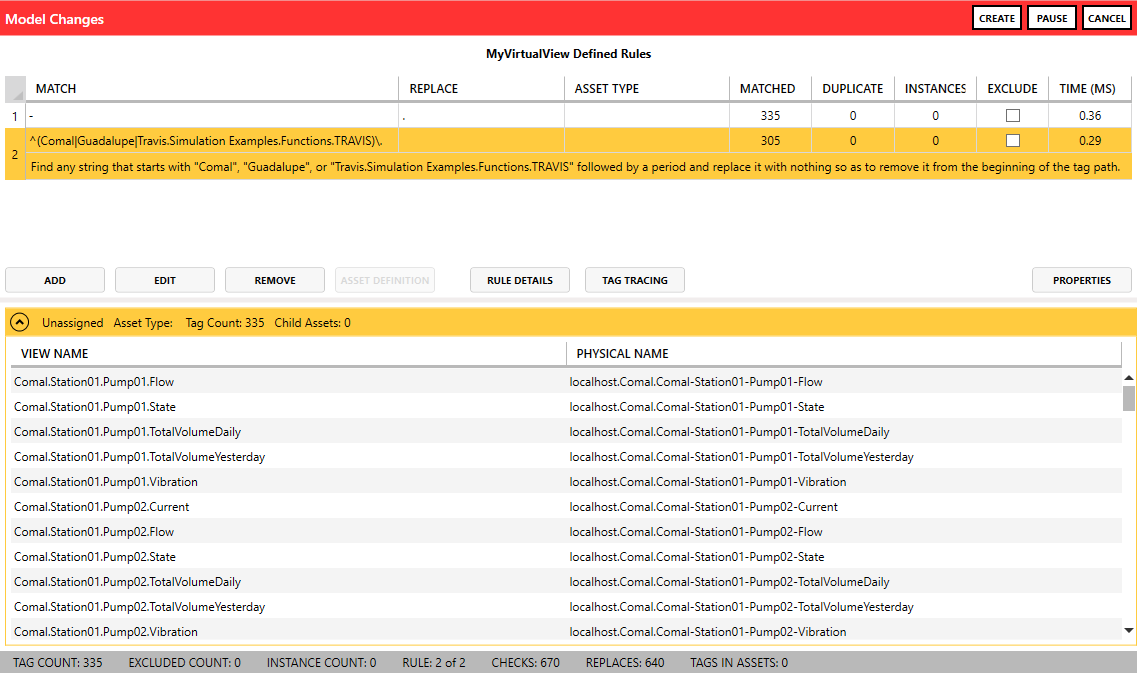
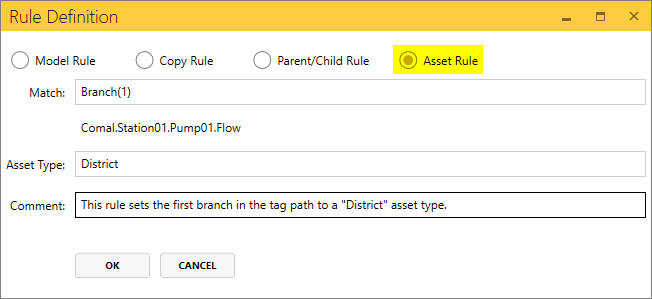
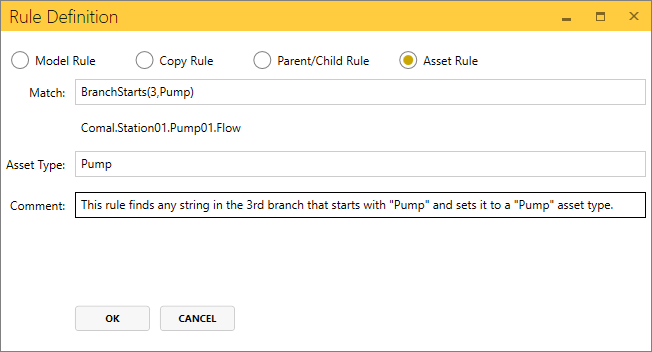
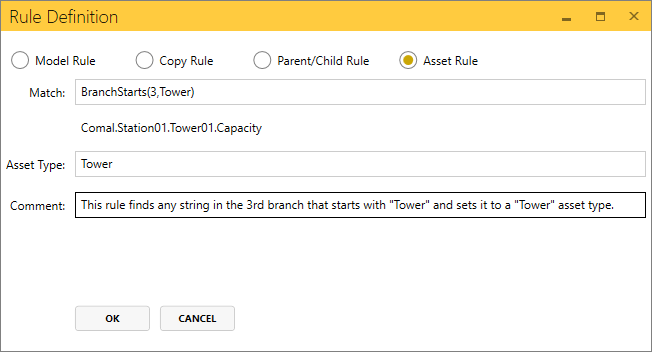
- Define Asset types. Once all of the Model rules have been applied and the desired tag structure has been achieved, the user can begin defining asset types at different levels of the hierarchy using Asset rules. Instead of using regular expressions, we will demonstrate the custom functions from the left window.
As there are four unique strings in the first branch of the tag path (Comal, Guadalupe, Hays, Travis), this rule discovered four Instances of the "District" asset type. You'll also notice the preview at the bottom of the screen has updated to show the four districts.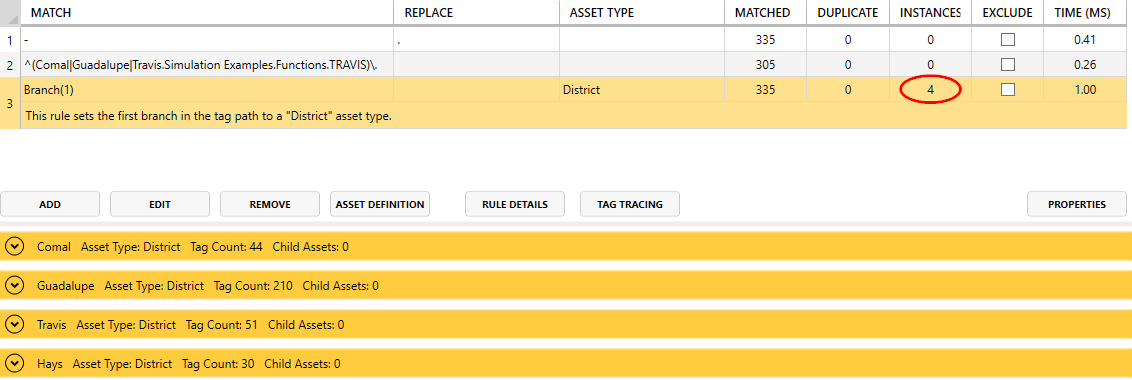
Add more Asset rules as needed to define other asset types found at lower levels of the hierarchy. In this example, these will be child assets of the District.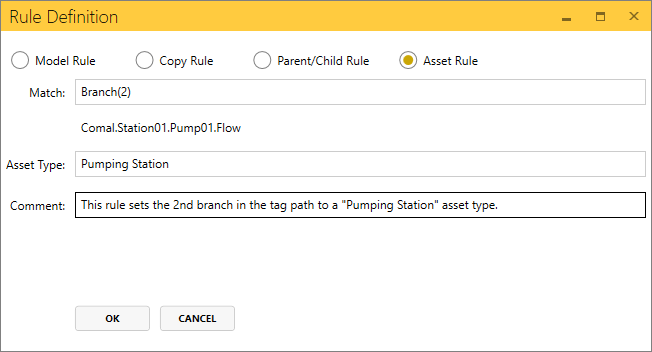
Copy Rules and Parent/Child Rules are used for more complex models and may require technical assistance from a Canary representative. As such, they are not demonstrated in this article.
- Once all asset types have been defined, click the CREATE button.

- (Optional) If there are any tags that do not fall under a given asset type the user has the option of removing them from the view. Click the PROPERTIES button and set the Non-Asset Tags drop-down to Exclude from Model. Apply changes.

- CLOSE the edit screen. A tile will appear for the newly created virtual view for clients to access and consume its data.